The light was brutal. That kind of sideways morning sun that doesn’t forgive anything, especially not the streaks and dull patches on an old wooden sideboard you’ve been pretending not to see for years. Emma ran her hand across the surface, feeling the dry, tired veneer that used to glow in her grandmother’s house. Now it just looked… old. Not antique-old. Just sad-old.
She’d already checked prices for professional restoration the night before and closed the tab fast. Too expensive, too complicated, not this month.
Then a friend texted her a photo: the same kind of wood, suddenly warm, silky, almost new again. Under it, just one line: “Microfiber cloth, homemade mix. Ten minutes.”
She stared at the message, half skeptical, half hopeful.
Could it really be that simple?
The tiny cloth that quietly changes tired wood
A microfiber cloth doesn’t look like a miracle tool. It’s light, soft, almost flimsy in the hand. Yet restorers swear by it, especially when it’s combined with a gentle homemade solution that respects the wood instead of suffocating it.
The magic is in the way those countless microscopic fibers grab dust, old polish, and fingerprints without scratching the surface. Every pass almost “erases” a layer of dullness.
Used dry, it already makes a difference. Used slightly soaked in the right mix, it suddenly becomes something else.
Not a gadget.
A quiet, precise instrument that wakens grain and color you forgot were there.
Talk to any furniture restorer and they’ll have a story that starts with, “You won’t believe this sideboard.” One Paris-based specialist told me about a 1960s oak table brought in by a young couple. It looked almost grey, with water rings, a film of old wax, and dull corners nobody had dusted properly in years.
Before sanding or staining, she tried the “soft path”: a microfiber cloth, barely damp with a simple mix she uses every day. Ten minutes later, half the tabletop looked like it had skipped twenty years of life.
The couple thought she’d already started refinishing. She hadn’t. She’d just removed all the tired layers sitting on top of the real wood.
Sometimes restoration begins with subtraction.
What happens on the surface is almost chemical theater. Old polish, aerosol spray, kitchen grease, and micro-dust form a sticky film that changes the way light hits the wood. You’re not seeing oak or walnut anymore; you’re seeing residue.
The homemade solution softens this film just enough. The microfiber cloth, with its split fibers and huge contact surface, pulls it away in tiny controlled movements, instead of spreading it around.
That’s why you suddenly see depth again: real grain, real color, subtle reflections. The cloth isn’t “rejuvenating” the wood in a mystical way.
It’s simply letting the original finish breathe again, which often looks astonishingly close to brand-new.
The simple homemade mix restorers actually use
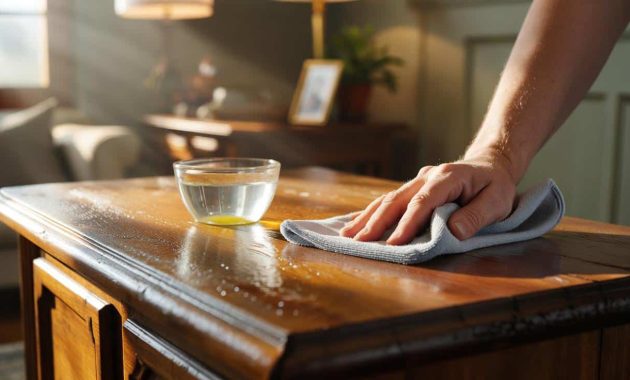
Here’s the routine many pros quietly follow at the workshop. They start with a clean, good-quality microfiber cloth, the kind you’d use for glasses or car detailing, not a shaggy kitchen rag. Then they mix their solution in a small bowl: roughly one part white vinegar to three parts lukewarm water, plus a teaspoon of olive oil or food-grade mineral oil per cup of liquid.
Dip a corner of the cloth, then wring it out hard. The cloth should feel barely damp, not wet.
Working in small sections, they wipe along the grain with light, repeated strokes. No rubbing like you’re scrubbing a pan. Just patient passes, flipping the cloth as it gets dirty.
A second, dry microfiber cloth finishes the job, buffing the surface lightly until the wood looks calmer, clearer, almost refreshed from the inside.
At home, this is where things often go sideways. People use too much product, too much water, or too much enthusiasm. The temptation is strong: if it looks good after one pass, you want to go faster, harder, wetter. We’ve all been there, that moment when you’re sure “just a bit more” will fix everything faster.
That’s when wood swells, edges lift, finishes cloud. The goal isn’t to soak the furniture but to gently wake it up.
Let’s be honest: nobody really does this every single day. That’s fine.
Once or twice a season is usually enough for most pieces, especially if you dust gently in between and skip the glossy silicone sprays that promise miracles and leave long-term problems.
Restoration expert Laura Medina put it bluntly when I asked her about this DIY method.
“People think you need a workshop and heavy tools to revive wood. Most of the time, you just need patience, a good cloth, and a solution that doesn’t bully the surface,” she said. “The real damage often comes from rushing, not from the recipe.”
To keep that patience on track, many restorers repeat a few simple rules:
- Always test your homemade solution on a hidden corner before touching the main surface.
- Use a slightly damp cloth, never dripping, and work in the direction of the grain.
- Buff with a second dry microfiber cloth to avoid streaks and sticky spots.
- Avoid this method on unfinished, raw, or very cracked wood without professional advice.
- Stop immediately if the color transfers heavily to the cloth: the finish might be unstable.
These small habits create a quiet, almost meditative rhythm, where each gesture counts more than the product itself.
➡️ 9 parenting attitudes that create unhappy children, according to psychology
➡️ Everyone throws it in the trash, but for your plants, it’s pure gold and nobody cares about it
➡️ An ‘ingenious’ Ukrainian idea so good China patented it for its next high?tech battle tank
➡️ Cucumber with aloe vera: why this simple combination is so often recommended for skin
➡️ “I’m over 60 and my knees hurt only in the morning”: the overnight stiffness reason
➡️ Why your houseplants turn yellow even when you water them regularly
When a cloth and a bowl of liquid carry family history
Once you’ve seen a dull chest of drawers regain that soft, mellow glow, it’s hard to look at old furniture the same way again. The scratches don’t vanish, the tiny dents are still there, but they become part of a living surface instead of a tired one. *The wood stops looking abandoned and starts looking loved.*
You begin to understand why so many restorers recommend this kind of gentle care first, before thinking of sanding, stripping, or replacing. Sometimes a microfiber cloth and a homemade mix are less about cleaning and more about listening.
You pause, move slowly, notice each patch of grain. You choose which mark to keep, which stain to tame, which memory to let remain visible.
This is also where a simple how‑to quietly turns into something social. People share before-and-after photos in family chats, ask parents where a piece came from, suddenly remember who bought that cupboard or who polished that table every Sunday. A routine that costs almost nothing unlocks stories that were sleeping in the corners of the room.
You may end up restoring more than just wood.
A sideboard from the 80s becomes “the sideboard from grandma’s apartment.” A thrift-store find becomes your child’s first desk, worthy of care and continuity.
The process is light, but what it carries feels heavy in the best way.
So the next time the morning light hits that old cabinet and your first reflex is to look up rental vans or catalogues for something new, you might reach for a different solution. A bowl, a splash of vinegar, a little oil, a microfiber cloth. Ten slow minutes.
The result won’t be perfect, and that’s precisely the point. Wood that has lived shows it, and that quiet patina is part of what makes a room feel human.
You’re not chasing a showroom finish. You’re giving everyday objects a second wind, with gestures so simple they almost feel like cheating.
Sometimes the most discreet tools on the shelf are the ones that bring a home back into focus.
| Key point | Detail | Value for the reader |
|---|---|---|
| Microfiber + mild solution | Use a barely damp microfiber cloth with a mix of water, white vinegar, and a little oil | Restores clarity and shine without costly professional products |
| Gentle, patient movements | Work along the grain, in small sections, and buff with a second dry cloth | Reduces risk of streaks, swelling, or finish damage |
| Test and observe | Always test on a hidden area and stop if the finish lifts or color transfers heavily | Protects fragile antique pieces while still benefiting from DIY care |
FAQ:
- Can I use this method on all types of wooden furniture?It works well on most finished woods (varnished, sealed, or waxed), but you should avoid raw, oiled-only, or very damaged pieces without expert advice and always test on a hidden area first.
- Will the vinegar damage the finish over time?Used heavily diluted and rarely, vinegar is generally safe on sealed finishes; the danger comes from concentrated solutions or daily use, which can dull certain coatings.
- Can I replace olive oil with another oil?Yes, many restorers prefer light mineral oil because it doesn’t go rancid; if you use food oils, stick to very small amounts and don’t overuse them.
- How often should I clean my wooden furniture this way?For most pieces, once every few months is enough, with soft dry dusting in between; high-traffic tables may benefit from monthly care if they stay dry.
- What if the wood still looks dull after cleaning?If the finish is worn or scratched through, cleaning alone won’t be enough; that’s when a professional assessment or a more complete refinishing project might be the real solution.