Gardeners in Europe are talking about an easy propagation trick that turns a single rosemary plant into several strong new bushes, without sowing seeds or fiddling with traditional cuttings in compost.
Why you should multiply your own rosemary
Rosemary, or Salvia rosmarinus, is one of those herbs that never quite lasts long enough in the kitchen. Sunday roast, traybakes, focaccia, even cocktails – the sprigs disappear quickly. Buying a fresh pot every few weeks costs money and creates plastic waste.
Propagating your own plants changes that. By taking a few stems from one healthy rosemary bush, you can create a steady supply of new plants for the patio, balcony or allotment. You keep the flavour you already love, and you sidestep the wait associated with growing from seed.
Home-grown rosemary gives you a consistent aroma, lower costs and fresh sprigs just a few steps from your stove.
There’s also a resilience angle: if your main plant suffers from frost, heat, or simple neglect, a batch of younger “backup” plants means you never lose the variety you like.
The simple water-rooting trick behind the method
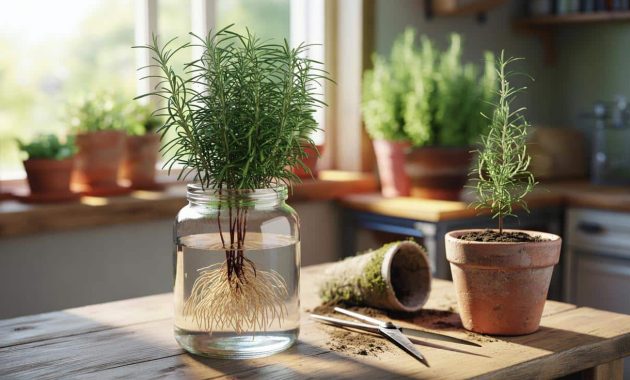
The method making the rounds in gardening circles looks deceptively basic: use water like an incubator and let the plant do the rest. No rooting powder, no propagator, no heated mat.
Step 1: choose the right stems
Instead of sowing or putting woody cuttings straight into soil, this approach focuses on soft, green growth from your existing rosemary. You want fresh shoots about 10–15 cm long that bend slightly rather than snap.
- Pick healthy, green stems with no yellowing or brown tips.
- Avoid flowering stems; the plant is focused on blooms, not roots.
- Take cuttings from a vigorous, well-lit plant rather than a tired supermarket pot on its last legs.
Once you’ve snipped your stems, strip off the needles from the lower third. That bare section is where new roots will emerge.
Step 2: let rosemary root in lukewarm water
Instead of pushing the stems into compost, place them in a glass or jar of lukewarm water. The leafless sections should sit underwater, while the leafy tops stay above the surface to keep photosynthesis going.
Keep the glass in bright shade, not full sun, and change the water every two days to prevent rot.
➡️ Netflix: one of the greatest action-adventure films ever, you have only 2 days left to watch it
➡️ The trick to creating a chic updo in under a minute
➡️ Australia: rare brain-eating amoeba with 97% mortality rate found in tap water
➡️ Why consistent wake-up times matter more than bedtime
➡️ This oven recipe works when you want food, not fuss
➡️ Attention, surprise: this heat-loving fruit tree thrives in cool climates (and not just a little)
This is the detail many people overlook. Strong sun heats the water and stresses the cuttings. Cool, indirect light lets them invest in root growth rather than in defending themselves from scorch.
Step 3: wait for the “root beard”
After 4–8 weeks, small white roots start to appear along the submerged section. They often form a light “beard” rather than one thick root. At this stage the stems are no longer just twigs; they’ve become baby plants.
Once the roots reach a centimetre or two, they’re ready to move. Leave them too long in water and they can become fragile and more likely to snap when you pot them up.
From glass to pot: how to plant water-rooted rosemary
Moving rosemary from water to soil is where many people lose plants, not because the method fails, but because the transition is too abrupt or the compost stays too wet.
Choose a free-draining mix
Rosemary comes from Mediterranean conditions, where roots hate sitting in boggy soil. A loose, sandy mix is key. An easy option is:
- 1 part standard potting soil or garden soil
- 1 part sharp sand or horticultural grit
Use pots at least 15 cm deep so the root system can develop. Good drainage holes are non-negotiable.
Planting and first weeks of care
Make a small hole in the compost with a pencil or stick. Gently lower the rooted stem into the hole, avoiding pressure on the delicate new roots. Firm the compost lightly around the stem so it stands upright.
Place the pots in a sunny spot with around 6–8 hours of light, but shield them from the harshest midday glare during their first week in soil.
Water thoroughly once after planting, then let the top of the compost dry before watering again. Constantly soggy compost is the fastest way to lose young rosemary plants.
Five reasons gardeners are switching to this trick
Beyond the satisfaction factor, there are clear practical advantages to multiplying rosemary this way.
- Lower cost: One established plant can supply dozens of new ones, eliminating regular shop purchases.
- Consistent flavour: Because the plants are clones, their aroma and oil content stay very similar to the mother plant.
- Faster harvest: Water-rooted stems typically produce usable leaves more quickly than seedlings.
- Flexible planting: You can root stems on a windowsill in winter and pot them up once conditions improve.
- Less waste: Fewer plastic pots, labels and transport miles from buying new plants each year.
Long-term care: keeping your new rosemary plants thriving
Once your propagated plants have settled, they behave much like any other rosemary. A few habits keep them compact and productive for years.
Pruning without weakening the plant
Regular cutting encourages bushy growth, but there is a limit. Aim never to remove more than a third of the foliage at one time. Deep cuts into old, brown wood can leave bare, non-sprouting sections.
Snip lightly and often instead of taking huge handfuls once every few months. Those kitchen cuttings double as your future propagation material.
Feeding and spotting stress signs
Young plants appreciate occasional feeding. An organic fertiliser such as compost, worm castings or well-rotted manure added sparingly around the base in spring usually does the job.
Yellowing or dropping needles on a new plant are a red flag. They often point to:
| Symptom | Likely cause | Action |
|---|---|---|
| Yellow needles, wet compost | Waterlogged roots | Improve drainage, water less |
| Brown, crispy tips | Drought or intense direct sun after potting | Water deeply, give light shade for a few days |
| Soft, collapsing stems | Rot in water or soil | Discard and start with fresh stems |
Common mistakes when using the water method
Even simple tricks have pitfalls. Gardeners often run into the same three problems with rosemary in water.
Leaving stems in water that’s too cold or too hot
Using icy tap water or leaving the glass in strong sun slows root development and stresses the stems. Room-temperature, slightly lukewarm water in a shaded spot gives more stable conditions.
Ignoring water changes
Stale water encourages bacteria and mould. Changing it every two days keeps oxygen levels higher around the base of the stems, which supports root formation.
Rushing the move to soil
Planting before proper roots form often leads to wilted stems that never recover. On the other hand, leaving them too long in water makes the roots soft and breakable. Watching for that 1–2 cm root length is a practical middle ground.
How this trick fits into a wider herb-growing strategy
Once you’ve used the method for rosemary, it becomes a template. Many woody herbs – such as thyme, sage and lavender – can be encouraged to root in water, although some prefer direct contact with compost.
For small urban spaces, the approach opens up a neat rotation: keep one or two older “mother” rosemary plants in larger tubs and regularly root side stems in jars indoors. The new plants can replace any that become woody, leggy or damaged by cold snaps.
There’s also a food-waste angle: the lower part of a supermarket rosemary bunch, usually thrown away, can sometimes be rescued for propagation if the stems are still green and flexible. Not every bundle will work, but the cost of trying is close to zero.
Two terms are worth separating as you experiment. “Cutting” usually means a stem placed straight into a compost mix, often with hormone powder. The water method creates a sort of “pre-rooted” cutting, where you can see roots before the stem touches soil. Both rely on the plant’s ability to regenerate; the difference is where that root-building happens.
Used sensibly, this technique turns one mid-priced rosemary plant into a small hedge along a path, a row of pots on a balcony rail, or even a collection of gifts for neighbours. The trick itself is low-tech, almost old-fashioned, but it aligns neatly with current concerns about cost of living, waste and self-sufficiency – all starting from a glass of water and a few green sprigs.